Monday, September 30, 2019

Sewcial with Troupe part 2 - Appliqué and Costuming

I met with my students for a second part to our Sparkly Belly Appliqué and sewing party/sewcial.  Find all of Mao's tutorials here on Sparkly Belly dot com.

We managed to cut out and sew our sleeveless choli tops with ties from the patterns we created last time, and we also finished most of our no-sew 10 minute skirts.  We also continued beading our appliqués to finish our troupe project.  I was happy that we were able to do some actual sewing this time, everyone brought their machines, fabric, thread, and had to learn how to use them!

 Beading, cutting out patterns, spinning bobbins, threading machines and learning about different stitches.

 Putting together the costumes where our appliqués will end up eventually.


Our finished tops!  We forgot to get a photo in our skirts, but when we are totally done I will update the blog with the full costumes and appliqués.  Thank you, Mao!  The Appliqués are available in Mao's Sparkly Belly Shop here. 

You can find info about my troupes on my website.

Sunday, September 15, 2019

Appliqués from Sparkly Belly

I was fortunate enough to be a part of Mao's Sparkly Belly appliqué project for dance teachers, where she mailed teachers her DIY Appliqué kits for free, with the hope that they be sewn and completed with the teacher and their students at a "sewcial," and then posted on social media.  I had done a similar sewcial (without any materials from Mao, but using her tutorial), with my West Covina class previously, to make her 3 panel mermaid skirts (read my blog post here for the mermaid skirt sewcial).

This project was more of a challenge than the mermaid skirts.  It was to be completed within two months, and the ultimate goal is to get the appliqués on actual costumes that we create for our troupe.  I began by starting an appliqué by myself to see how it worked, knowing that time is our most valuable asset and people are busy.  I have never actually beaded anything before, so this was a new challenge for me.  My Mom is a sewer and a beader so I enlisted her help initially to guide me with the beading.  Together we did a large and small appliqué prior to working with the group.  Once I got the hang of how to do the stitches, it went smoothly and easily.  I have to balance my time being a mom, teaching classes and working on this project so that was my challenge, fitting in the time to sew.  Mao sent us the teardrop style in purple.  Everything we needed was included in the kit.  The only thing I used that was mine was scissors.

I scheduled the sewcial to take place after one of my dance classes on the weekend.  I had three of my dancers join me for the first sewcial, all non-sewers.


Mao's instructions were very good, well thought out and clear.  The biggest hurdle was time, and the initial learning curve, because none of us were experienced in beading.  After meeting with my dancers and having our first sewcial, we realized that we needed to do several of these "workshops" because of the detail in the appliqués, and because we wanted to make our own costuming to utilize the appliqués.

The appliqués look very professional and definitely add a nice finishing touch to costuming.

Our plan was to create the Sparkly Belly 10 minute DIY wrap skirts with ruffles and matching sleeveless choli tops and place the appliqués on them.  We have two guys in our group so we also are going to do the harem pants tutorial.

After finishing our appliqués, we agreed to meet again and work on the costuming tutorials to put our appliqués on the following week.  Stay tuned for my next blog post, hopefully we will have the costumes done with our beautiful appliqués!


Thank you to Mao for sending the beautiful appliqué kits for myself and my students, we had a great time sewing together and learning!  Visit Sparkly Belly to learn more about Mao's wonderful costuming tutorials and to get your own DIY appliqué kits to make your costuming look amazing! 

 You can find info on my troupes at my website.

Thursday, September 12, 2019

So Many Fabrics, So Little Time

When making mermaid or wrap style skirts and matching choli style tops, the fabric you use must be stretch, and you have to use a stretch stitch to sew them.  Check out the "performance fabrics" (or swimsuit fabrics) or the stretch velvets as these are the easiest to sew.  Performance fabrics can range from $5/yard to $30/yard.

Always check the integrity of the fabric before you buy it.  Some do not "come back" from the stretch even though they are "stretchy" material.  These are a disaster for costuming.  Gently tug a very small section (about an inch) in the direction of the stretch and see if the fabric tears or if it stays in tact.  If the fabric stays nicely woven, it will work for any stretchy skirt or top pattern.


If you are making a more generously cut (does not need to stretch) circle skirt or harem "pantaloon" style pants, I recommend using a soft chiffon, satin, jacquard, or "silk essence" style fabric.  The important part of choosing this material is the drape or how the fabric "falls" from your body.  If the fabric is too stiff, it will not be good (or comfortable) to dance in.


Some fabrics are easier than others to sew on as well.  Fabrics with sequins can break your needle and the sequins themselves can break.  Other fabrics can pull while you are stitching and possibly create runs in the fabrics.  It's a good idea to experiment on a small scrap before working on a big project that might be expensive.

Monday, September 2, 2019

Skeleton Dance - No Bones About This Costume

Our troupe was going to do a Skeleton-themed dance at a Halloween Hafla and I had a month to figure it out.  I was hoping to use inspiration from bones from the dollar store, plus flowers to make it pretty and using orange fabric and black netting.

This was not my most successful costume.  It looked better in my mind and as I was designing it, and I ultimately wore only parts of it, but I hope to re-visit it, as I do when I have trouble executing my vision.

There were lots of fun bones and things at the dollar store, which is where I started for inspiration.  I used some orange fabric someone had gifted me, which was going to be an asymmetrical skirt.


I used Simplicity 1033 for the skirt.  I struggled with the skirt material, which is why this costume was ultimately not as successful as I would have hoped.

I had leopard printed netting and black net, plus this orange material (organza?) that did not sit well as a skirt.  I didn't realize this until I had already followed the store bought pattern and sewed the whole skirt.

I laid out several different combinations of flowers and bones on a cheap bra I bought.

I made a simple belt, using a pattern I had from a troupe I danced in previously.  I made a youtube belt tutorial here for my students.  There are commercially available belly dance costumes, including Simplicity 2158 and Simplicity 2941.

The belt was made from scrap materials I had left over from other costumes, plus felt for interfacing.


I struggled with the black of the bra and belt, and not being able to see the outline either piece when I wore it over my "bones" bodysuit.  Everything looked great on the table, but not so much on me.  It blended in and just was not working.


The finished outfit.  I did not end up wearing the skirt and I was unhappy with the placement of the flowers.  Next time I think I would use a color other than black or put some sort of trim around the bra and belt.


Bits and Baubs of Sewing Projects from Sparkly Belly

As a dancer, or anyone in the performing realm knows, you have to be able to do a bit of sewing.  Costumes break all the time, and require upkeep and mending.  It was always a goal of mine to learn to sew, and being interested in costuming and theatre, but not always having the time to do so, I have been inspired in the times I have a spare moment or two to start on little projects.

Where to begin, if you are new at sewing or you are on a budget and want to create some pieces for your troupes?  I always point people to Mao Murakami's Sparkly Belly Blog.  I'm going to showcase some of the projects I've made using her blog here in this entry.

When I began teaching, my first thought was to use the 10 minute DIY Tribal Overskirts and DIY 10 Minute Cowl Neck Top as troupe costuming, but at the time, I only ended up making these projects for myself.  Perhaps in the future I'll persuade some of my students to also make some.


Since I was new to this sort of thing, working without patterns, I went to my local fabric store and found some stretch material that was on sale.  I made several of the tutorials using this same material.

After creating the Tribal Overskirt, the Easy Sleeveless Choli, a mermaid skirt and a shrug out of the orange material, I felt more confident in my sewing.

I also made another Tribal overskirt out of a fun stretch camouflage.  These are great for practice too.


Using my custom-made to fit me mermaid skirt pattern I created from Mao's two part Mermaid skirt tutorial, I made a blue skirt and a gold velvet skirt.  Since learning, I have also figured out how to make my own godets to insert in the trumpet skirt for contrast or fullness, which I have incorporated into two complete costumes, I'll post more about that later in another blog entry.


One of my favorite projects was making the DIY LED veil wings from Mao's blog.  I made them on a rainy day when my kids were in school.  At the time, buying LED wings was cost-prohibitive so I thought it would be fun to make them myself.  It was the holiday season, so luckily the materials were readily available.

The hardest part of making the LED wings was the initial cut of the veil wings, because the fabric was not as wide as my pattern called for, and I had to adjust it to fit the amount of fabric I bought.  It was also a challenge laying out the Christmas lights but I managed to make it work pretty well.  These wings are shorter than traditional belly dance wings, but that means they are good for smaller spaces.  I have long arms though and I have to be aware of the tight/shortness in the range of motion at times while dancing.


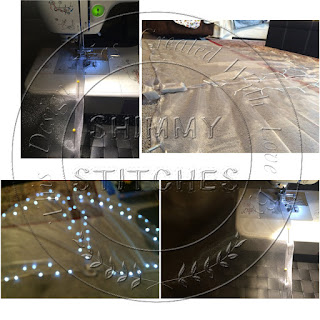
I used wooden dowels from the hardware store as my wing sticks, and I made a video tutorial for my students to follow on youtube.


I've made three versions of Mao's DIY shrug for dancers, one in orange, one in gold velvet to match my gold velvet skirt, and one in power mesh with diamonds on it.


The finished shrug below.


Lastly, I was very excited when Mao and Mahin of BDQ collaborated in their "Your Sparkly Wardrobe" series on a DIY Prop bag tutorial, one of my most-requested DIY's.  Unfortunately, I made mine a little too small, and it only fits my wings and some of my canes.  I used pleather and it came out really nice.  It does not fit my swords, as they vary in length, curvature and heaviness.  I would like to try again some day when I have time.


I can't emphasize enough what a treasure Mao Murakami's Sparkly Belly blog is for dancers.  Dancers should have a basic understanding of costuming and sewing and this definitely helped me!

Glitter & Gold - DIY Troupe Costuming

When creating troupe costuming, especially with a new troupe, it's a good idea to use neutral colors, like gold, black, silver, or copper.  I was building my troupe with my students in the classes I taught and I wanted us to have something classic which we could re-use at other events.  We decided to go with gold stretch velvet for our skirts.  That way we could mix and match our bedlah (bras & belts) or choli tops and hip scarves.  

I held a sewing workshop or "sewcial" at my home for some of my students and we planned about a month in advance before an upcoming performance at a local belly dance swap meet, where we would debut our costumes.


I had been a longtime follower of Mao Murakami's awesome costuming blog, SparklyBelly, and I offered to help my students make their own patterns so that we could make Mao's mermaid skirt and so that we could end up with a beautiful troupe costume where we all matched.  Three of my students joined me at the sewcial.

Armed with snacks, brown craft paper for drawing the pattern, rulers, tape measures, scissors, notebooks, pencils and some snacks, we all got together, and watched the videos, while helping each other measure to make our custom patterns.  


Each dancer made their own pattern by the end of our 3 hour sewcial.  I had already made my gold skirt, so I was able to show my students samples of what I did, including my pattern, the fabric and thread I used, and how it came out.  I also shared my other belly dance custom-made costumes that I created with my students, giving them inspiration and ideas.


I had already made several other projects from the Sparkly Belly blog on my own, including Mao's 10 minute Tribal Overskirt, and Easy Sleeveless Choli / Crop Top, the DIY LED (veil) wings, prop bag, and several of my own mermaid skirts using my custom mermaid skirt pattern that I drafted thanks to the blog.

We had a great time working on the custom patterns together, and then everyone went on a "field trip" to go get the gold crushed velvet fabric for our skirts.  

I used some additional scrap fabric I had to create Mao's shrug tutorial found here and one of my troupe mates made a Turkish choli type top to wear over her bra.

Although we ran out of time to actually sew that day, everyone finished their skirts in time for our upcoming show, and we wore them to perform at the swap meet a month later!  

They looked beautiful, and we were lucky enough to do an awesome 
photoshoot in our skirts that day at a gorgeous Banquet Hall after the show.


We were featured on Mao's blog in our troupe costumes, which we couldn't have made without her wonderful tutorials!  
special thanks to Signature Banquet Hall photo by L. Hall

Mermaid's Tale of the Sea - Making mermaid costumes for bellydance


Themed belly dance shows can be really tough to figure out.  How do you stay within the theme, but keep the integrity of the dance, while also paying tribute to the theme in a way that is unique and exciting.  Usually it's a requirement to use either music or costuming or both that fit the theme.  Some themes are easier than others, of course, especially if they already lend themselves to the familiar aspects of your dance, such a pirates (long skirts, swords, corset-style Renaissance Faire/bedouin clothing).  Other themes are definitely harder (Boy Band comes to mind!).  (photo above, selfie of a mermaid skirt off the rack from Spirit store).

I was excited to bring both of my student troupes to the Pirates hafla where we would be doing two separate takes on the theme.  One group would be mermaids, the other would be pirates.  Since this is one of the most-documented of my costumes, I'm featuring the Mermaid costumes on my blog.

For the mermaids, fabric is key.  Luckily, a lot of really cool mermaid fabrics have come out recently, especially with the popularity of cosplay.  Being a fan of both cosplay and bellydance, it's twice as awesome for me.  I happen to find a ready-made skirt at the local seasonal Halloween store, which was. beautiful, but way too long to dance in, but I was confident I could fix it.  The skirt had a train on it that was about an extra 8-10 inches long.  I wanted to have a matching bra and hopefully arm bands as well.  So I took the skirt home, and with simple modifications, I trimmed the excess off the bottom and took in the sides a little, and added slits for a perfect fit.

There was plenty of fabric leftover from the ridiculously long skirt to cover a bra and make upper arm bands.  I found some pretty chiffon fabric in blue with fish on it to add a little flounce to my arm bands (from the Yaya Han cosplay fabrics line at JoAnn's).


I had an idea to add pearls to the bra mimicking the shape of a seashell.  I ultimately did not like the result and took them off, leaving the bra to shine on it's own with the fabric and a dropped jewel from the center.


I did not have enough mermaid fabric to cut a belt but I definitely wanted something complementary to finish my mermaid costume.  I used a plain purple, with interfacing and I found a pretty "bubble" fabric in bright blue stretch which complimented the mermaid fabric.  The mermaid fabric has a blue-purple-green iridescent look to it, depending on the lighting.

I also wanted to make a mermaid crown.  I researched crowns and found a lot of them on Pinterest, but it was harder than I thought to make something that was both pretty and practical.  I bought some sea stars, painted them silver, and put crystals and glitter on them, but they proved to be troublesome on the crown, poking me and not sitting well.  I opted for only one in the center of the crown.  I did end up using two stars on the belt and one sea shell in the center.  My kids commandeered the other sea stars.


I also had a lot of seashells, which I incorporated on the fishnet-style drop I had on the belt.  I added some rhinestones as well and put glitter on the seashells.

Sadly, I did not wear the crown because it was interfering with my sword dance.  Here's the finished costume, and my troupe-mate's similar mermaid costume.  Her costume used fabric from JoAnn's Yaya Han line of cosplay fabric.  I was really pleased at how our costumes came out and looked together!


Rehabbing Old Costumes Into Something New

I've always loved costumes, which is part of the reason initially that I was drawn to belly dance.  From the beginning I attempted to make pieces of costumes, and tried to make my own ensembles, in addition to purchasing costumes along the way.  That being said, creating a costume from scratch is a huge undertaking and usually takes a very long time to complete.  I've learned from my mom, but also from experimenting on my own, buying patterns and trying to make costumes from inspiration in fabrics and other textiles.

Sometimes if we wear a costume enough to be bored with it, or styles change and it feels dated, it can be a good idea to see if parts of it may be salvageable or even better, if enough fabric remains to change the look of the costume entirely and give it a fresh makeover.

If I'm not entirely happy with the way a costume comes out, I will take elements of it apart and see if I can up-cycle them to a new costume.  I have also inherited costumes from other dancers, which didn't quite fit my style, or needed to be changed in some way.

I took this pink costume, which originally consisted of harem pants (pantaloons), a bra top and a tied skirt (which, unfortunately, consisted of 4 inch strips of fabric, hanging down in a way that didn't flow nicely), and I wanted to make a matching belt and a front/back panel skirt instead.  I wore this costume a few times, but I felt like I could make it look more flattering as my body had changed from the time I originally created it.

I had used the black fringe on another costume, which I was unhappy with, so I removed and re-purposed that to be part of this re-made costume. I had found the flower for the belt from a friend, and I thought it tied in the black lace in nicely, and complimented the costume perfectly.  I loved the pop the black gave the pink, and it was a perfect match for the lace sleeves I had purchased from Mesmera at a belly dance show.


Costuming Reconstruction - Transforming a Dress into a Costume

Troupe costuming is always a challenge.  People have different levels of comfort as far as how much coverage they want, different styles, but the troupe director wants the group to look unified and cohesive, identifiable as a group of dancers, and not simply a bunch of individuals who got together to dance.

For our studio recital a few years ago, we purchased similar "goddess dresses" to perform in, and then we customized the dresses to fit our different styles, while retaining the look of "a troupe."  These dresses all had a slight animal print to them, in different colors and slightly different patterns but they were uniform enough to look very troupe-like.

Upon examining the original dress, my idea was to cut the top from the bottom under the bust, and then take apart and re-cut the bottom in a mermaid-style skirt to make it fit in a form-fitting way, as the skirt was rather baggy.  It was a lovely dress on it's own but it needed to fit like a costume would to allow movement but be flattering on stage.

  This was a bit scary, taking the dress apart, but I could definitely see it starting to take shape, almost instantly.  The top was pretty much done once it was separated from the bottom - it just needed hemming and a little bling to finish it off.
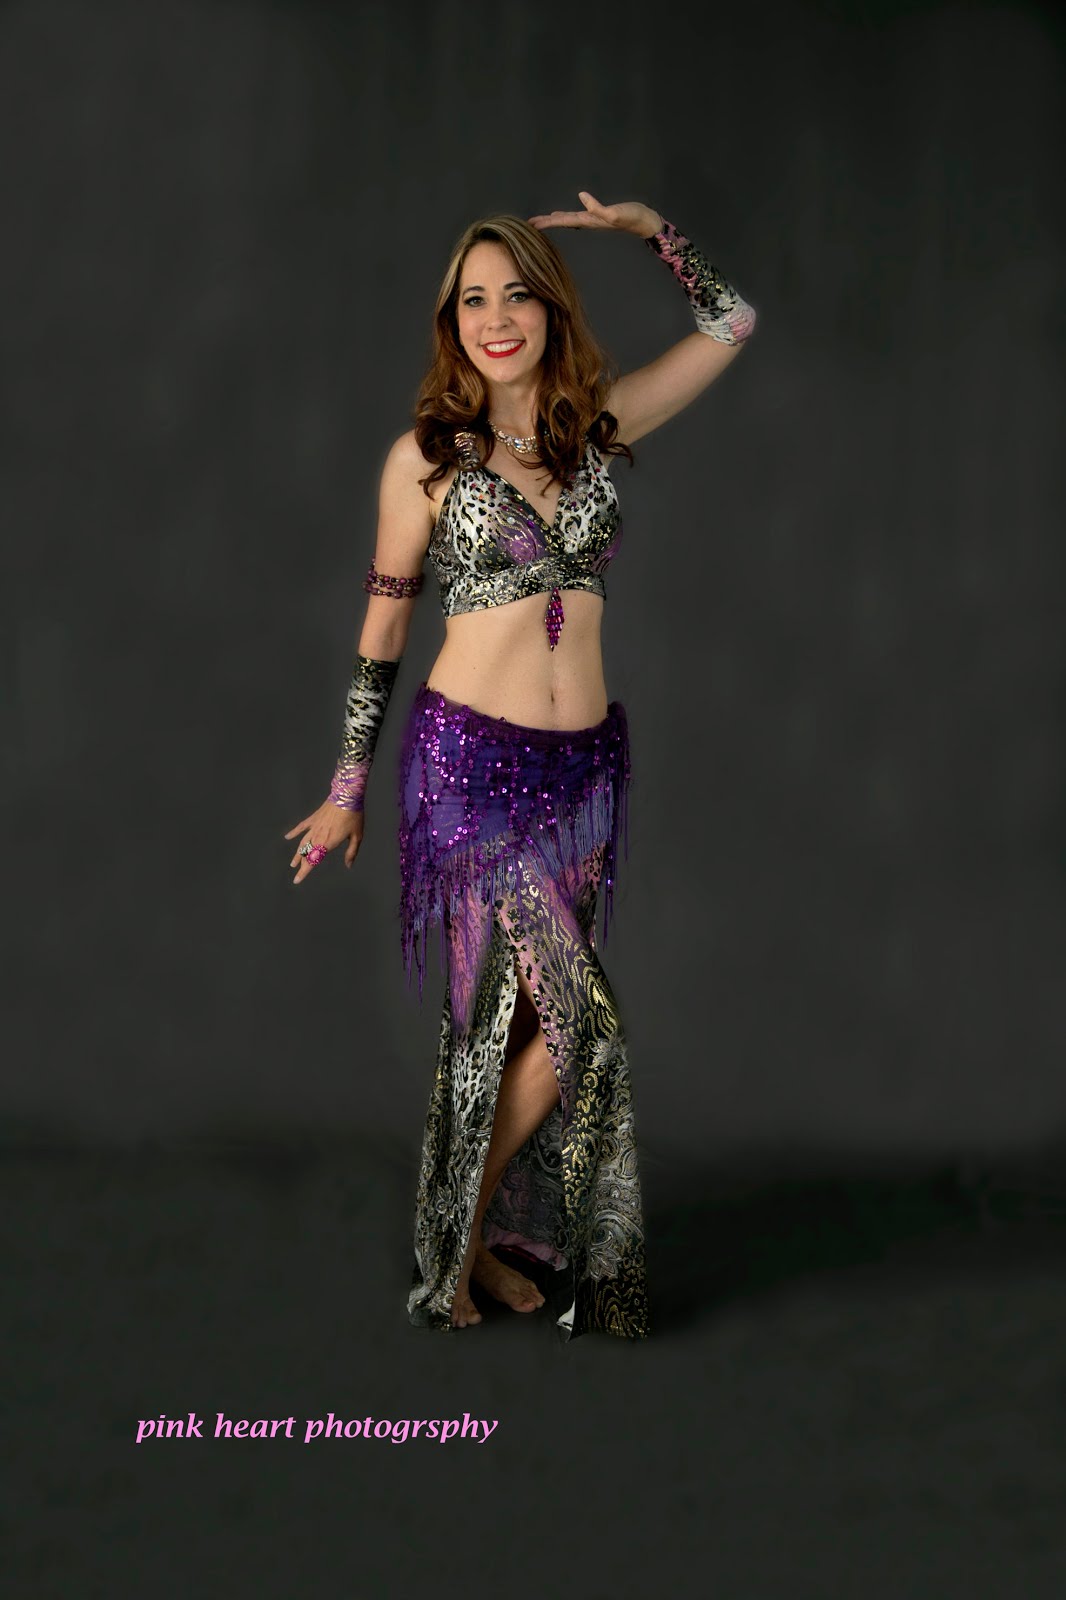
The skirt was more challenging.  I opened the seam so that I could see how much fabric I had.  I used my custom made pattern for a mermaid skirt that I made from Mao's Sparkly Belly tutorial online at her costume blog and was able to squeeze out a 3 panel skirt from the existing skirt fabric.  I even had enough material left over to make matching arm gauntlets.  Here is the finished result!


The other troupe members had their costumes altered by a seamstress.  Below is the photo from our studio recital.

Jessikah photo by Pink Heart Photography; troupe photo by Visioneuse